Monday 17 May 2010

Banana Breakfast Ring

This is the recipe I cook most from 'Feast' - it's so quick and easy to make, and is great for using up over-ripe bananas. It's also light and fluffy and has a slight lemony tang. I have to say I've never eaten it for breakfast though!

In a large bowl mash up bananas well, then add oil, eggs, lemon juice and zest, vanilla and caster sugar. Whisk them all together with a fork.

Add flour and raising agents (or self-raising flour which is what I've started using) and fold to combine.

You end up with a lumpy mixture - very muffin-like, which is probably exactly what it is. A big muffin.

Pour it into an oiled bundt tin, or normal round cake tin. Cook for 30-40 minutes at 180 C.

When it's all golden on the top, remove from oven and leave to cool in the tin for 5 - 10 mins.

Remove from tin and decide which is the 'right' way up to serve the cake. I think with bundt tins the bottom is the top bit, but I don't really like the look of this side.

This looks much better to me. Slice and eat while still warm, but it's great cold too.

Ingredients:
3 medium bananas
60 ml oil (I use olive oil)
3 eggs
zest and juice of half a lemon (I use a little zest and a decent squirt of lemon juice)
1 tsp vanilla essence
200 g caster sugar (I use 140 g)
325 g plain flour, 1 tsp baking powder, 1/2 tsp bicarb - or 325 g self-raising flour

Saturday 15 May 2010

Quick Apple Cake

When I made the Quick Apple Flan I said I would be interested to see how it turned out with self-raising flour instead of plain.

Thisevening I made the self-raising version, and it really worked out quite well. This time it was definitely a cake instead of a flan - much more fluffy and light, and less sticky. Quite a different dessert, which is why I decided to rename it and give it its own post.

Really good with custard. Original recipe here but replace the plain flour with self-raising.

This time I used two largish granny smith apples, and chopped them up a bit smaller to make slicing the cake easier.

Wednesday 12 May 2010

Vegetable Pasta Bake

This is a good way to use up stray vegetables that you might have hanging around and that you don't want to waste, and also a good way to feed everyone quite a lot of vegetables without them really noticing.

Finely chop up an onion and fry it gently in some oil in a big pan. Add some garlic and then start adding any vegetables you have.

I finely diced some celery and added that (ssshhh! don't tell anyone about the celery, it's a controversial vegie around here! But no one noticed it was there...)

Add any other finely diced vegetables - I had some choy sum stalks and leaves, a red capsicum and a couple of carrots.

Normally I coarsely grate carrots, as they take a while to cook. This time I diced them and they stayed a little crunchy which I liked.

Add a jar of passata, a little water, some oregano, basil, salt, pepper and sugar. Bring to the boil, then turn down the heat and simmer gently for half an hour or so.

In the meantime heat up a big pot of water and cook some ravioli or tortellini. I also cooked a little bit of dried pasta to make the meal go a little further. (Use a non-meat-filled pasta for a vegetarian version of this meal obviously.)

Drain the pasta and stir it into the sauce. I always reserve a little of the cooking water before draining, just in case the sauce needs a little extra liquid.

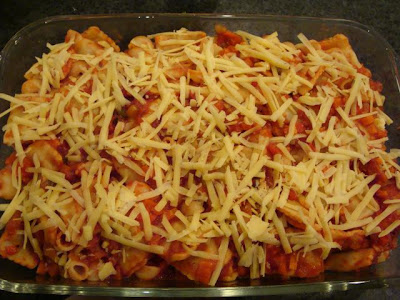
Put the whole lot into a baking dish and top with grated cheese. Put in a hot oven for 5-10 minutes, until the cheese has melted.

Ready to serve.

Our rabbit loves it when we have lots of vegies too!

Tuesday 11 May 2010

Pizza

Home-made pizzas are so tasty, and also pretty easy to make. I use a Bill Granger recipe for the base, because the dough is stretchy, non-sticky and easy to handle.

I also make my own tomato sauce, so it isn't the quickest meal I make. Actually, considering the time and effort that goes into making these pizzas, and the speed at which they are demolished, sometimes I feel like buying them instead!

But I enjoy mine more than bought ones, and not just because mine cost a lot less!

In a large bowl, stir together flour, salt and yeast. Combine water and honey and add to the flour mixture. Stir in, and add olive oil.

Mix together with a spoon, then put your hands in and bring together into a dough. Knead for several minutes, either in the bowl or on a floured surface.

Leave covered in a warm place for 1 to 2 hours until doubled in size.

Push out air and remove from bowl. Divide into four pieces, and knead each piece lightly.

Put the four pieces of dough in a warm place and cover them. Leave for 20 - 30 mins until doubled in size, or just puffed up a bit.

Roll out each ball of dough to make a (rough in my case) circle. Apparently these should be 30 cm diameter, but I can only ever manage 25 cm at the most.

Put a little oil on your hands and on the rolling pin if things are getting a bit sticky.

I put my bases on a metal tray lined with baking paper. Not very authentic, but it saves on mess and cleaning up later.

Spread with tomato sauce of your choice ( I make mine with simmered tinned tomatoes, herbs and seasoning) and toppings - in this case sliced cabanossi, sliced mozarella and grated cheddar.

Cook in a 220 C oven for 10-12 minutes. Leave to cool for a couple of minutes, then cut into pieces (preferably with a pizza cutter because it's much easier) and serve.

I do mine one at a time because I find they cook better on the middle shelf.

This one had cabanossi, red capsicum and cheese.

My favourite has just cheese. Not very pretty or glamorous, but tasty!


Ingredients for dough:
500 g bread/bakers flour
1 tbsp salt
2 tsp instant yeast
1 1/2 tbsp honey
300 ml warm water
50 ml extra virgin olive oil

Sunday 9 May 2010

Quick Apple Flan

I saw this recipe in the Frills in the Hills blog, using pears. I tried it and it was pretty good, but I thought the tang of apple would be better. So thisevening I made the apple version for dessert.

Helping me with the measuring were these pretty baboushka doll cup measures, sent to me by the lovely people at The Claytons Blog. Each one opens and has a different volume marked inside, and they all fit together neatly.

The original recipe calls for 1 kg of fruit, but I used four pink lady apples which weighed just under 500 g. Peel, core and slice.

In a large bowl, mix together eggs, milk and sugar.

Add flour and spice and beat until you have a thick batter.

(If the batter is very thick, add a little more milk.)

Add fruit and stir in well.

Pour into a greased baking tin which has baking paper in the base. Cook for 40 - 45 mins at 190 C until golden. Cool in tin for 20 mins and then remove to a cooling rack.


Serve warm with custard or ice cream, or eat cool as a slice.

This is a quick, cheap and easy dessert, which is a good alternative to apple pie or crumble, and everyone here really enjoyed it.

If I have one criticism, it is that the batter becomes a little 'leathery' and I wonder what would happen if self-raising flour were used instead. (Hopefully nothing too disastrous, as I'll be trying it next time!)

(for the self-raising flour version look here)

Ingredients:
500 g apples, peeled, cored, sliced
2 eggs
1/4 cup milk
1 cup sugar
1 1/2 cups plain flour
1/4 tsp mixed spice and a shake of ground cinnamon